This guide walks you through moving an existing Minecraft server from another hosting provider to Obsidian Servers. Whether you have a small survival server or a large network with plugins and databases, the process is straightforward.
There are two ways to transfer your files:
- Server Importer (recommended) - Pulls files directly from your old host over FTP/SFTP, no downloads to your computer needed
- Manual transfer - Download files from your old host, then upload them via SFTP
Before You Start
Before making any changes, take time to prepare. A little planning here prevents headaches later.
Keep Your Old Server Running
Do not cancel your old hosting until the migration is fully tested and you have confirmed everything works on Obsidian Servers. Having both servers available lets you compare settings and recover files if needed.
Document Your Current Setup
Make note of the following from your old host:
- Server software and version - e.g., Paper 1.21.4, Forge 1.20.1, Fabric 1.21
- Java version - check your old host's startup settings
- Plugins or mods - list every plugin/mod and its version
- Custom startup flags - any JVM flags or startup parameters you use
- Database details - if any plugins use MySQL databases (e.g., LuckPerms, LiteBans, economy plugins)
Back Up Your Old Server
Download a full backup from your old host before making any changes. Most hosts offer a backup or download feature in their panel. Save this to your computer as a safety net.
Note Your Old Host's FTP/SFTP Credentials
If you plan to use the Server Importer, you will need your old host's FTP or SFTP connection details:
- Host address
- Port number
- Username
- Password
Check your old host's panel or documentation for these details.
Setting Up Your New Server
- Order a server at Obsidian Servers if you have not already
- Log in to the Game Panel
- Select your server
- Set your server to the same software type and Minecraft version as your old server using the Version Changer (Game > Versions). See Choosing a Server Version (JAR Types) for help picking the right option
- Go to the Startup page and verify the Java version matches what your old server uses
- Do not start the server yet - import your files first
Transferring Your Files
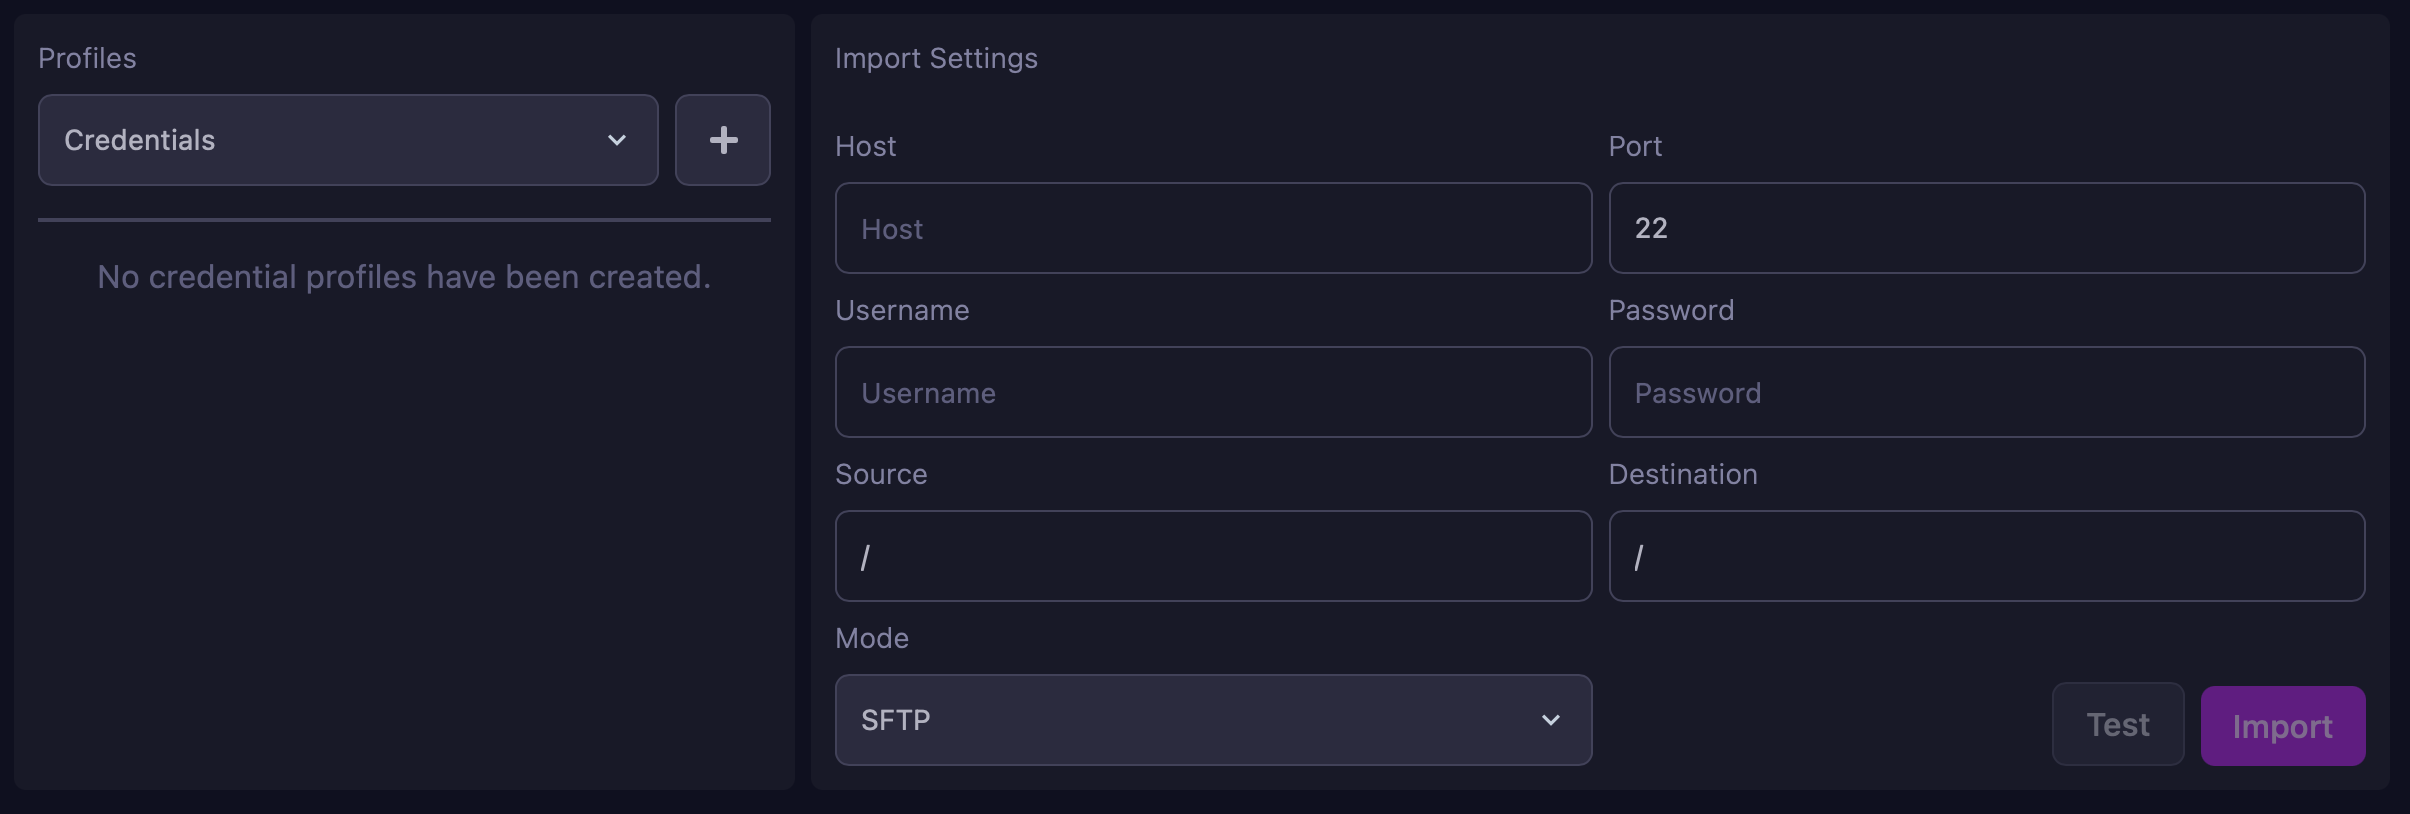
Method 1: Server Importer (Recommended)
The Server Importer connects directly to your old host and pulls your files over, so you do not need to download anything to your computer first.
- Log in to the Game Panel
- Select your server
- In the left menu, click Game
- Select Importer
- Enter your old host's connection details:
- Host - Your old server's FTP/SFTP address
- Port - The FTP/SFTP port (usually 21 for FTP or 22 for SFTP)
- Username - Your FTP/SFTP username from your old host
- Password - Your FTP/SFTP password from your old host
- Select whether your old host uses FTP or SFTP
- Connect and browse your old server's files
- Select the files and folders you want to import
- Start the import and wait for it to complete
Tip: The import speed depends on the size of your files and the connection between the two hosts. Large servers may take some time.
Method 2: Manual Transfer via SFTP
Use this method if your old host does not provide FTP/SFTP access, or if the Server Importer does not work with your old host.
- Download your server files from your old host to your computer
- Connect to your Obsidian Servers server via SFTP (see How to Access and Manage Server Files for full SFTP setup instructions)
- Upload your files to your new server
Tip: To speed up the transfer, compress your files into a ZIP archive before uploading. Once uploaded, use the File Manager (Core > Files) to extract the ZIP - click the three dots next to the file and select Unarchive.
What Files to Transfer
Not everything from your old server needs to come across. Here is what to bring and what to leave behind.
Files to Transfer
| Files/Folder | What It Contains | Required? |
|---|---|---|
world/ (and other world folders) |
Your world data, builds, and terrain | Yes |
plugins/ |
Plugin JARs and their config folders | Yes (if using plugins) |
mods/ |
Mod files | Yes (if using mods) |
server.properties |
Core server settings (difficulty, MOTD, whitelist, etc.) | Recommended |
bukkit.yml / spigot.yml / paper-global.yml |
Server software configuration | Recommended |
whitelist.json / banned-players.json / ops.json |
Player access lists | Recommended |
server-icon.png |
Server list icon (64x64 PNG) | Optional |
| Custom JAR file | If using a custom server JAR | If applicable |
Files NOT to Transfer
- The default server JAR - Obsidian Servers provides this through the Version Changer
eula.txt- This is generated automatically- Host-specific files - Any files or folders specific to your old hosting provider (these vary by host)
Migrating Databases
If your plugins use MySQL databases (common for LuckPerms, LiteBans, economy plugins, and others), you will need to migrate those separately.
Step 1: Export From Your Old Host
Export your database from your old host. Most hosts provide phpMyAdmin or a similar tool:
- Open phpMyAdmin (or your old host's database tool)
- Select the database
- Click Export
- Choose Quick export with SQL format
- Download the
.sqlfile
Step 2: Create a New Database
- Log in to the Game Panel
- Select your server
- In the left menu, click Data
- Select Databases
- Create a new database and note the credentials (host, database name, username, password)
Step 3: Import Your Data
- Open phpMyAdmin for your new database (accessible from the Databases page)
- Select your new database
- Click Import
- Upload your
.sqlfile - Click Go to run the import
Step 4: Update Plugin Configs
After importing, update each plugin's configuration file to point to the new database. Look for settings like:
hostoraddress- change to your new database hostdatabaseorname- change to your new database nameusernameoruser- change to your new database usernamepassword- change to your new database password
Updating Configuration
After transferring your files, several settings will need updating to work with your new server.
Plugin Configs With Old IP Addresses
Search your plugin config files for your old host's IP address or hostname and replace them with your new server details. Common plugins that store connection info include:
- Votifier/NuVotifier - IP, port, and keys
- BungeeCord/Velocity configs - server addresses
- Dynmap - web server settings
- Any plugin with external connections - webhooks, API endpoints
Server Properties
Open server.properties and check:
server-port- verify it matches the port assigned to your new server (shown on the Console page)server-ip- remove any value here or leave it blank to let the server auto-bind to the correct address
Startup Variables
Go to the Startup page in the Game Panel and verify the startup variables match your old setup, including:
- Java version
- Server JAR file name
- Any custom JVM flags
Testing Your Server
Before announcing the switch, test thoroughly:
- Start the server and watch the console for errors
- Check plugins - run
/pluginsin the console and verify everything loaded - Join the server and check that your worlds loaded correctly - verify builds, player inventories, and terrain
- Test database features - permissions, economy balances, ban lists, and any other database-dependent functionality
- Invite a few players to connect and test before going fully live
If you see errors in the console, check the Troubleshooting section below.
Going Live
Once everything is working, update your server address everywhere:
- Minecraft server list sites - update your IP/address on all listing sites
- Voting sites - update the server IP, port, and Votifier details on every voting site
- Your website or Discord - update any posted server addresses
- Custom domain DNS records - if you use a custom domain, update your DNS records to point to the new server. See Connecting a Custom Domain for instructions
- Set up a subdomain - if you want a clean
your-server.obby.hostaddress, create one from Network > Subdomains in the Game Panel - Enable DDoS Protection - a migration is a good time to enable this since your IP is changing anyway. See DDoS Protection Explained for setup instructions
Once you have confirmed everything is working and your players can connect, you can cancel your old hosting.
Troubleshooting
Server Won't Start After Import
- Check the console for error messages - they usually point to the exact problem
- Verify the server software type and Minecraft version match your old server (Game > Versions)
- Check the Java version on the Startup page
- Make sure you did not transfer the old server JAR over the one provided by the Version Changer
World Not Loading
- Check
level-nameinserver.properties- it must match the name of your world folder exactly - If your old server used a different world folder name (e.g.,
survivalinstead ofworld), either rename the folder or updatelevel-nameto match - For servers with multiple worlds (e.g., using Multiverse), make sure all world folders were transferred
Plugins Failing to Load
- Check the Minecraft version compatibility for each plugin
- Verify that plugin dependencies were also transferred (e.g., Vault, ProtocolLib)
- Look at the console output during startup - plugins usually log why they failed
Database Connection Errors
- Double-check the database credentials in your plugin configs
- Make sure you are using the new database host, not your old one
- Verify the database was imported correctly by checking it in phpMyAdmin
Players Can't Connect
- Confirm you are sharing the new server address (check the Console page for your connection details)
- Make sure the server is online and fully started
- If using a subdomain or custom domain, verify DNS has propagated
- Check that
server-portinserver.propertiesmatches the assigned port
Need Help?
If you run into issues during your migration, we are happy to help:
- Support Ticket
- Discord Server - use the
/supportcommand - Email: [email protected]